>> CONNECTING THE 1-WIRE TEMPERATURE STATION TO THE INTERNET
I just couldn't do nothing with my new temperature sensor rig - I had to get
it online!
In my
previous
blog entry I focused on rigging up some Dallas Semiconductor 1-Wire DS18B20
temperature sensors to an Arduino. In Australia; temperature is a big topic
so; why not slap on a WiFi shield and have it communicate to a cloud service
and then render the data into something useful so I can tease all my friends
on how nice the weather is down here.
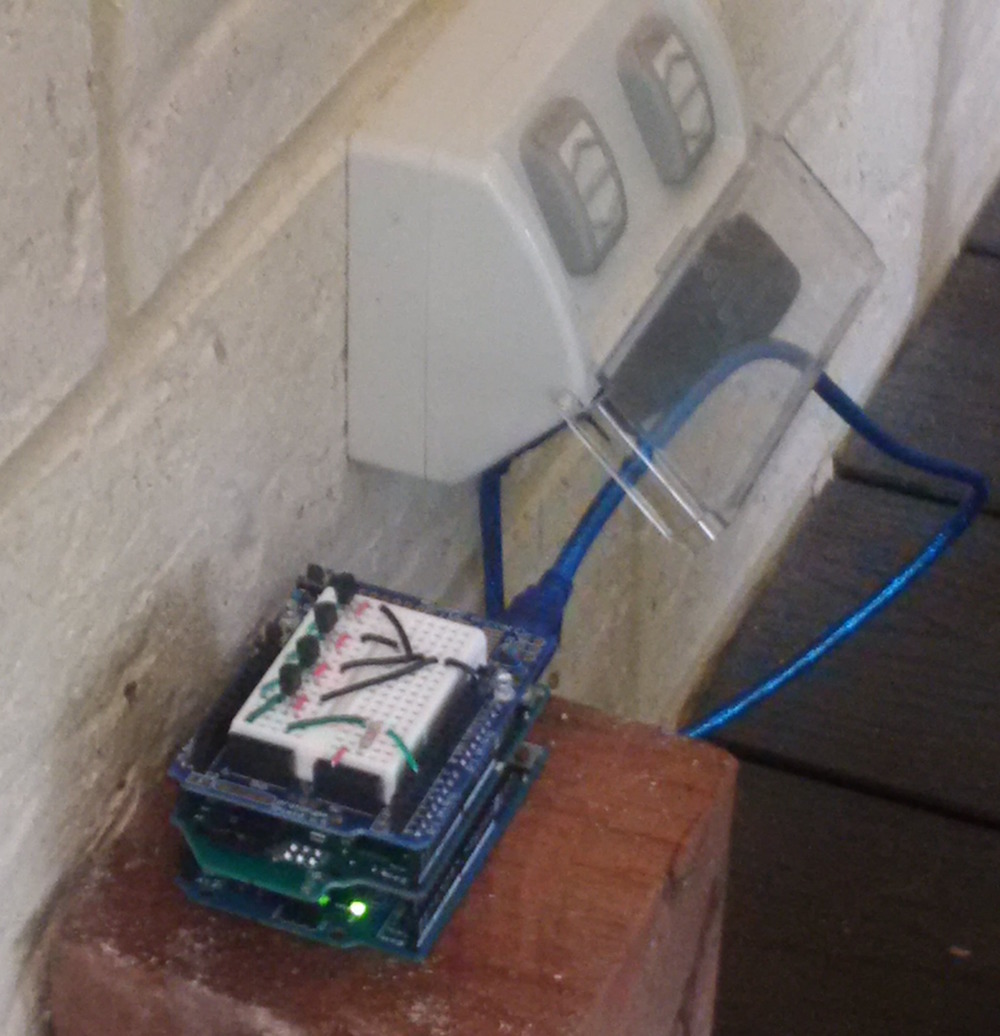
To get started; I needed to add some networking to the Arduino.
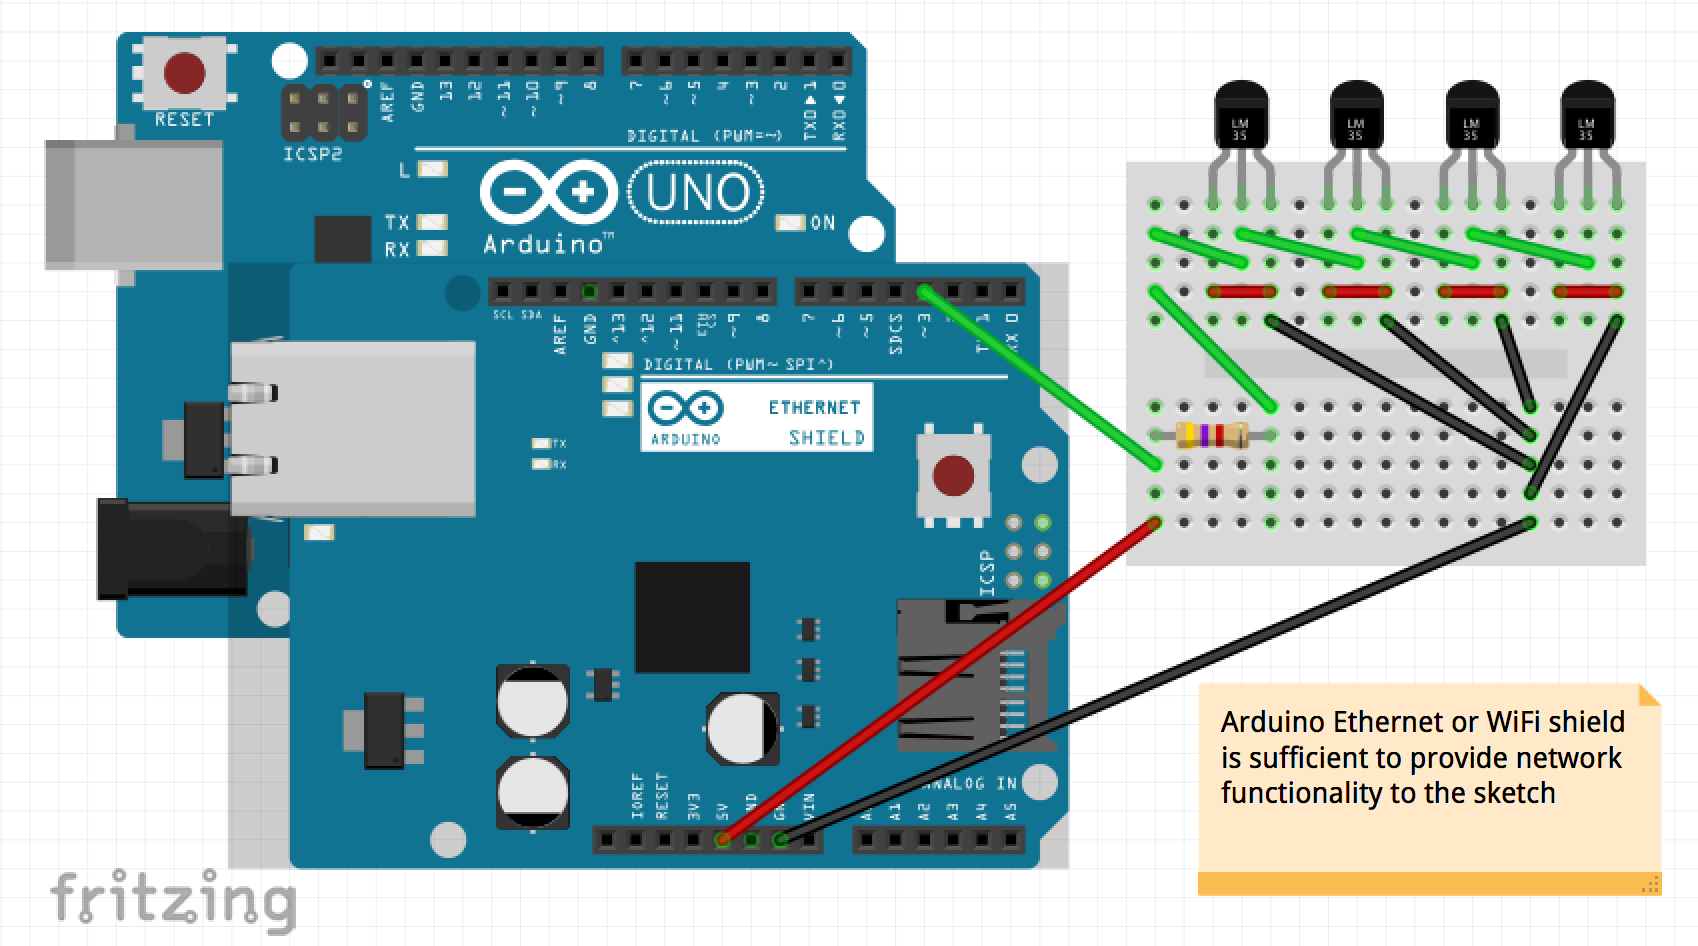
I chose to use the
Arduino WiFi Shield
as I could utilize my home WiFi network for data transmission. The great
thing with Arduino shields is the ability to simply stack them on top of each
other - I was able to put the existing prototyping shield on top of the
WiFi shield as-is. The sketch will change slightly if you are using an
Arduino Ethernet Shield - but the changes are minimal.
The first decision is where to send the data. I wrote a custom cloud service
using php but you could use any public service for publishing the data from
your sensors.
dweet.io
is a simple and free service if you are ok with publicly publishing
your data for the whole world to see.
The source code for the sketch is available here:
In the interest of security I removed my WiFi network credentials and the
URL of the web service where the data is sent. You will need to adapt the
code to match the requirements of the service you want to connect to. In
this example; I am using a HTTP POST without any authentication.
// network configuration
char ssid[] = "XXXXXXXX";               // your network SSID (name)
char pass[] = "XXXXXXXX";               // your network password
int status = WL_IDLE_STATUS;

// server configuration
char server[] = "XXX.XXX.XXX.XXX";      // IP address of server
char serverName[] = "www.xxxxxxxx.com"; // hostname of server
char serverUrl[] = "/xxx/";             // URL on the server for POST
int  port = 80;
The above settings are the ones to change to match your WiFi network and the
server you wish to connect to. The contents of the postdata variable
will also need to match the requirements of the service you will connect to.
The
Arduino Playground
has some example sketches showing how to perform a HTTP GET and POST request -
in fact; my code was based on them.
The first modification to the sketch was to average out the four temperature
sensors to use as a reading.
float temp_accumulative;
int   temp_count;

...

// we want to start counting temperatures
temp_accumulative = 0;
temp_count        = 0;

...

// do we have no more addresses?
if (!onewire.search(addr))
{
  Serial.println("No more addresses.");

  // lets figure out the average temperature across the sensors
  celsius = temp_accumulative / temp_count;
  fahrenheit = celsius * 1.8 + 32.0;

  // display the resulting average temperature
  Serial.print("  Temperature (average) = ");
  Serial.print(celsius);
  Serial.print(" Celsius, ");
  Serial.print(fahrenheit);
  Serial.println(" Fahrenheit");
  Serial.println();

...

// record the value for the average calculation
temp_accumulative += celsius;
temp_count++;
Easy enough - surely that doesn't require any explanation!
The next part was to create the variables that I would send over to my
web server. In my case I built a generic web service that accepts a
unique identifier (uuid) and data in the form of a JSON message - this
lets me use my service for more than just tracking the temperature.
The basic essence is that the Arduino would send the following variables:
uuid = 73c374f6-75d4-40ab-af37-412c575c18be
data = { temperature: 20.0 }
This is stored in the postdata variable - using
URL Encoding - this makes sure nothing is lost or mis-interpreted
in the server side when the data is received. There is a catch to getting
your temperature into a string - as Arduino doesn't support %f in the
sprintf function.
char str_celsius[8];
char postdata[128];

// build some jason for the cloud service
dtostrf(celsius, 4, 2, str_celsius);
sprintf(postdata, "uuid=73c374f6-75d4-40ab-af37-412c575c18be&" \
                  "data=%%7B%%22temperature%%22%%3A%s%%7D", str_celsius);
The next step is to make a connection and send the data over the network:
if (client.connect(server, port))
{
  client.println("POST /");
  client.print(serverUrl);
  client.println(" HTTP/1.1");
  client.print("Host: ");
  client.println(serverName);
  client.println("User-Agent: Arduino/1.0");
  client.println("Connection: close");
  client.println("Content-type: application/x-www-form-urlencoded");
  client.print("Content-Length: ");
  client.println(strlen(postdata));
  client.println();
  client.println(postdata);
You do not need all of the parameters; but, it helps to identify that the
User-Agent is an Arduino and that you are defining the
Content-type to specify the content is a HTTP POST with URL encoding.
The content of the postdata variable is provided and we
set the Content-Length parameter appropriately. If you are interested
in the full HTTP/1.1 protocol - you can read up it within
RFC2616.
The sketch also has some other cool goodies to handle reconnecting to a
WiFi network, being able to receive the response and auto-close the connection
if no data has been received within a specific period of time. There is also
a millisecond counter to send data roughly once a minute (should be enough).
Running the sketch provided the following on the Console Log window:
(server details removed)
OneWire Sketch
--------------

author:  Aaron Ardiri
version: Nov 18 2015

Attempting to connect to WiFi SSID: xxxx
Connected
  IP Address:  192.168.1.66
  Subnet Mask: 255.255.255.0
  Gateway:     192.168.1.1
  MAC address: 78:C4:0E:03:A9:E2

ROM = 28 F0 74 DC 06 00 00 DC
  Chip = DS18B20
  Data = 9D 01 4B 46 7F FF 03 10 57  CRC=57
  Temperature = 25.81 Celsius, 78.46 Fahrenheit
ROM = 28 E1 CF DC 06 00 00 8F
  Chip = DS18B20
  Data = A1 01 4B 46 7F FF 0F 10 D9  CRC=D9
  Temperature = 26.06 Celsius, 78.91 Fahrenheit
ROM = 28 99 F3 DD 06 00 00 9C
  Chip = DS18B20
  Data = 95 01 4B 46 7F FF 0B 10 0B  CRC=B
  Temperature = 25.31 Celsius, 77.56 Fahrenheit
ROM = 28 05 89 DE 06 00 00 08
  Chip = DS18B20
  Data = A0 01 4B 46 7F FF 10 10 6E  CRC=6E
  Temperature = 26.00 Celsius, 78.80 Fahrenheit
No more addresses.
  Temperature (average) = 25.80 Celsius, 78.43 Fahrenheit

Attempting connection to server...
:: successfully connected to server
-- request:
POST /xxx/ HTTP/1.1
Host: xxx.xxxxxxxxx.xxx
User-Agent: Arduino/1.0
Connection: close
Content-type: application/x-www-form-urlencoded
Content-Length: 78

uuid=73c374f6-75d4-40ab-af37-412c575c18be&data=%7B%22temperature%22%3A25.80%7D
-- response:
HTTP/1.1 200 OK
Date: Wed, 18 Nov 2015 06:08:13 GMT
Server: Apache/2.4.10 (Debian)
Vary: Accept-Encoding
Content-Length: 105
Connection: close
Content-Type: text/html; charset=UTF-8

uuid = 73c374f6-75d4-40ab-af37-412c575c18be
_ts_ = 2015-11-17 23:08:13
data = {
    "temperature": 25.8
}
:: done
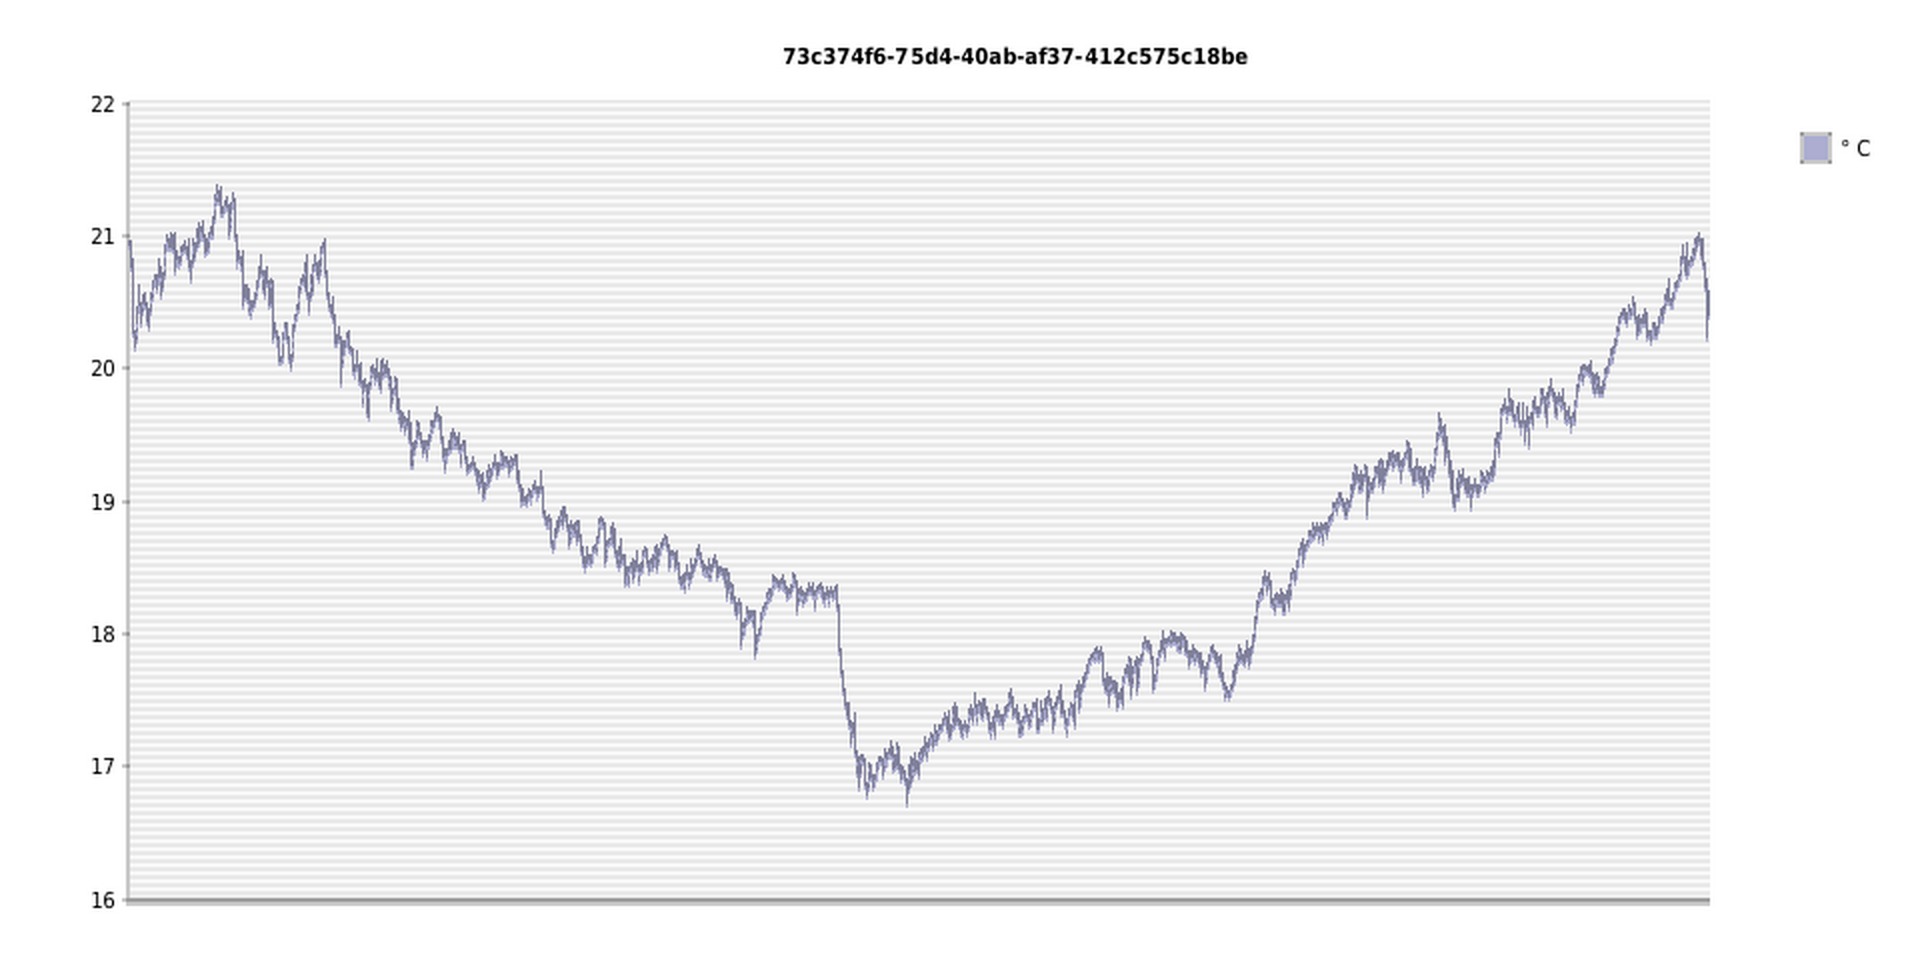
The device has been connected for almost twenty four hours now and I also
put together a quick graph of the temperature which you can see below. The
minimum temperature on my alfresco in the last twenty four hours was 16.72C
at 01:39 in the morning - and the temperature peaked at 15:47 with a
whopping 21.34C. It was a mild spring day here in the south-west of
Western Australia.
I may just need to make a small cover for the unit but effectively I could
leave the device running over the summer and see how warm it gets - it can
easily reach 35C in the shade here in the summer time. Best of all, I can
now monitor the temperature on my alfresco from anywhere in the world!
![[Valid RSS]](valid-rss-rogers.png "Validate my RSS feed")